Deploying to AWS using Elastic Beanstalk
Snap now has the AWS CLI installed on all build boxes. This allows you to perform a number of AWS operations including deploying to AWS using Amazon’s Elastic Beanstalk.
To deploy to AWS using Elastic Beanstalk you need to perform the following steps:
- Create an Elastic Beanstalk application.
- Create an environment where you wish to deploy your application.
- Create a S3 bucket where you can store your application to be deployed.
- Create an application version to deploy.
Prerequisites for Deploying to Snap
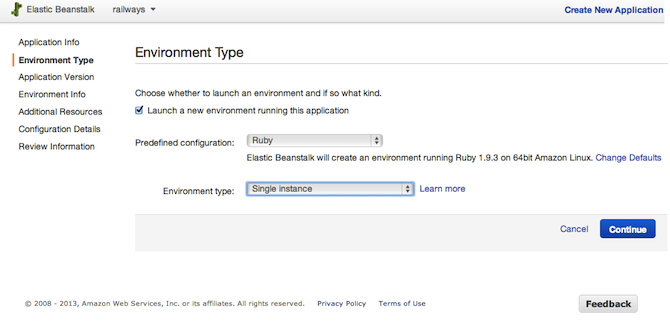
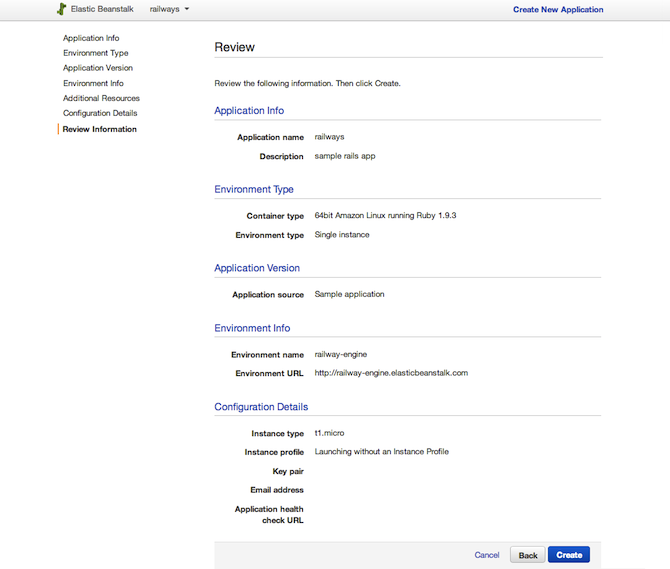
In order to start using Snap for AWS deployments, we first need to setup an Elastic Beanstalk application and environment from the AWS console as shown in the figures below:

Click on Create New Application to get started and follow the sequence of steps below to set up an application.


Note that if your application uses RDS you will have to create a RDS instance when creating your environment. You can view the steps for creating the RDS instance here. If you are using any other databases please ensure that you have them installed and configured on the environments you are deploying to.


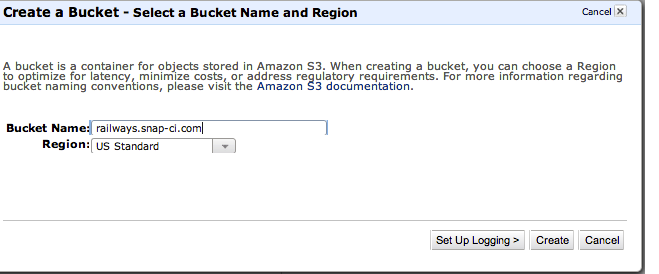
We will also need to create a S3 bucket where you can store your application versions to deploy:

Deploy your app from Snap
Once you’ve created a application and an environment using Elastic Beanstalk and created a S3 bucket to store the application versions, you can configure your project on Snap to start deploying to AWS. To deploy to AWS we will be adding a stage namedDeploy to your build pipeline that does the following:
- Create a zip file of your current build
- Upload the zip file to a S3 bucket for deployment
- Create a new application version to deploy
- Update the environment to use the new application version
To configure your project edit your build plan from the project configuration page as shown below:

Next click on ADD NEW and select Custom stage. Enter Deploy as the stage name and enter the following commands:
git checkout .
zip -r "APP_NAME.zip" * .*
aws elasticbeanstalk delete-application-version --application-name "APP_NAME" --version-label `git rev-parse --short HEAD` --delete-source-bundle
aws s3 cp APP_NAME.zip s3://S3_BUCKET_NAME/APP_NAME-`git rev-parse --short HEAD`.zip
aws elasticbeanstalk create-application-version --application-name "APP_NAME" --version-label `git rev-parse --short HEAD` --source-bundle S3Bucket="S3_BUCKET_NAME",S3Key="APP_NAME-`git rev-parse --short HEAD`.zip"
aws elasticbeanstalk update-environment --environment-name "ENVIRONMENT_NAME" --version-label `git rev-parse --short HEAD`
Next click on the Environment Variables tab and add the following environment variables required by AWS CLI:
- Key: AWS_ACCESS_KEY_ID Value: YOUR_AWS_ACCESS_KEY_ID
- Key: AWS_SECRET_ACCESS_KEY Value: YOUR_AWS_SECRET_ACCESS_KEY
- Key: AWS_DEFAULT_REGION Value: YOUR_AWS_DEFAULT_REGION
Click Add to create the Deploy stage.
Now, there may be a couple of things here that may not be immediately obvious. For example, we perform a git checkout as the first step before zipping the application. This is done because Snap symlinks its own database.yml for Rails builds. If you deploy using that database.yml your application will fail as we don’t define a production configuration in the one that we create for you. The git checkout resets your working directory on the build box.
Once this is done, we create an application archive.
The next thing you might notice is that we first delete any existing application versions with the same version label before creating a new application version with that label. This is done to ensure that you deploy the current build and not any previous versions.
Finally, the application archive’s contents are used to update the new version of the application.
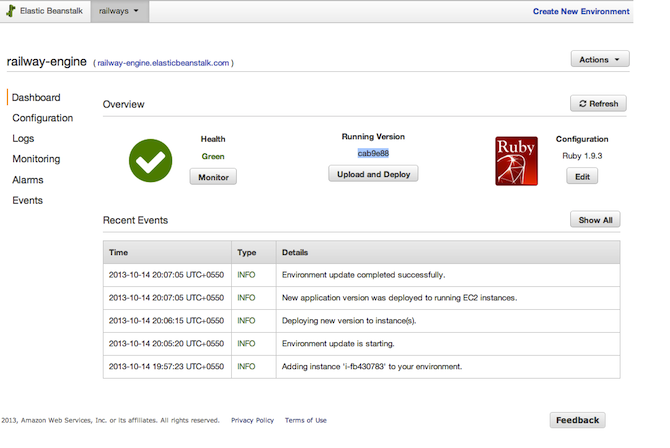
Now that you have the Deploy stage added to your pipeline, click the Save and Re-run button. Wait for the pipeline to complete and voila! You can now view your Elastic Beanstalk dashboard to see the status of your newly deployed application.

For more information see AWS CLI reference, Elastic Beanstalk.
Reposted from http://blog.snap-ci.com/blog/2013/10/21/aws-elastic-beanstalk/
Disclaimer: The statements and opinions expressed in this article are those of the author(s) and do not necessarily reflect the positions of Thoughtworks.


