
Recording Mobile Device Usability Testing Sessions – Guerrilla Style
One of the challenges of running usability testing on mobile devices is how to record a video of the session. Recording sessions on desktops is easy. Applications like Morae or Silverback have been allowing us to do screen captures with a picture-in-picture window of a participant’s face for years now. They simply use the mouse pointer and webcams to capture of full picture of what the user is doing.
On mobile devices it's not so easy. On mobile devices it’s just as important to see what the users hand/fingers are doing as the targets they are tap on. When you combine this with the movement of handheld devices recording a usability testing session becomes somewhat more complicated.
On a recent project, we ran 10 participants through a competitor comparison of apps. To record these sessions we put together a somewhat ad-hoc, yet highly effective recording setup that used this option of mounting a camera of the device. Here’s an overview of how we made it work, including:
- Choosing a video recording approach
- The pop-up usability lab
- The camera mount - Mr Tappy
- The cameras
- Recording software
- Remote broadcasting of the sessions
- Lighting
- What would we change next time?
Choosing a video recording approach
There are 3 current options that I’ve seen capture a session on a mobile device:
- Attach a camera to the device itself.
- Mount a camera above the space where the device will be used.
- Record a screen capture of the device.
Each of these has their relative pros and cons:
| Option | Pros | Cons |
|---|---|---|
| Attach a camera to the device itself |
|
|
| Mount a camera above the space where the device will be used |
|
|
| Record a screen capture of the device |
|
|
Personally I prefer the first option of attaching a camera to the device itself. In most situations having a clear view of the screen and the hands outweighs the participant’s feeling a little bit weird about the camera hanging over the device.
The pop-up usability lab
Having chosen to go with the option of mounting a camera on the device, we set about turning two meeting rooms in to a full-featured mobile device usability testing lab.
Here are some pictures of what we put together.
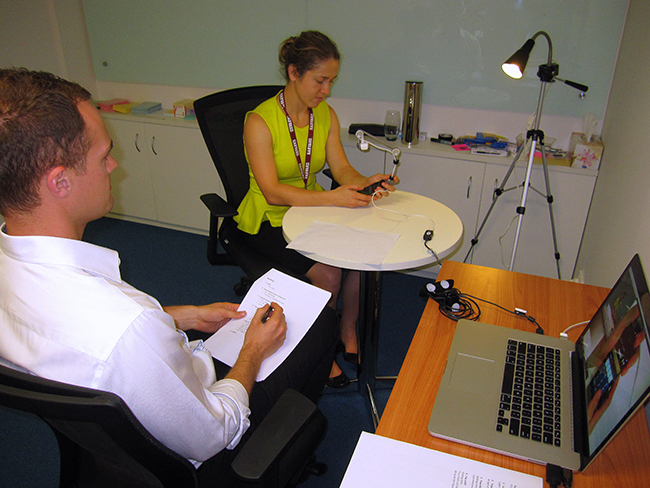
Above: A session in progress, with the participant using the phone and moderator guiding the session.
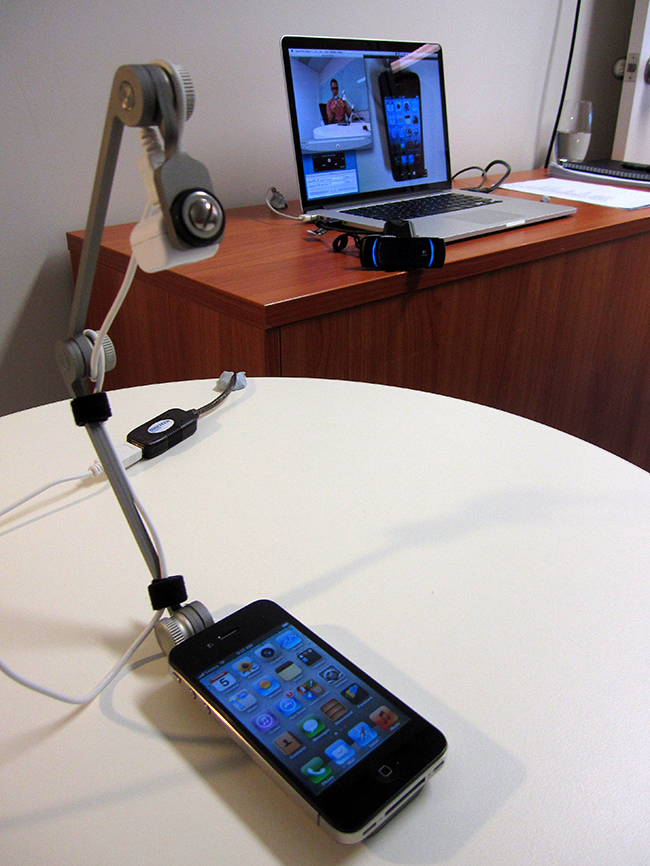
Above: The participant’s view of the device and recording equipment.
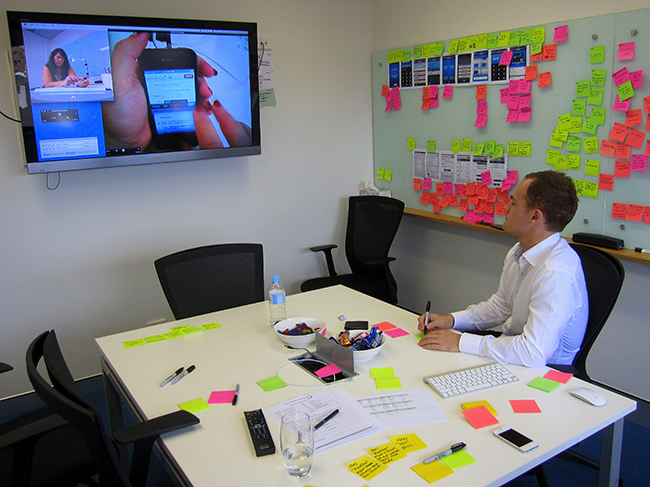
Above: A note taker observing the video feed from the next room, taking notes on post-its.
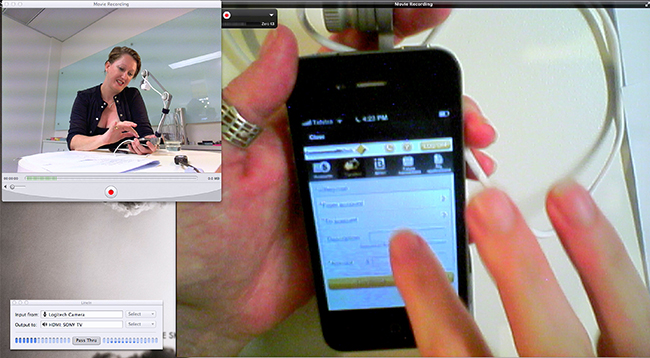
Above: The video output, the device view with a ‘picture-in-picture’ view of the participant holding the device.
What’s happening in the room?
The testing lab was made up of the following equipment:
- Two cameras; one mounted on the device, the other in front of the user capturing their face and them holding the device.
- Both cameras feeding in to a laptop, which was recording the session. We used a MacBook pro for this setup. This machine comfortably dealt the processing load for this setup. It also had the 2 x USB inputs and 1 x HDMI output that we needed to connect to the cameras and TV.
- Laptop sitting to the side where the facilitator could see it. This meant that the facilitator could sit back and watch what the user was doing through the screen rather than having to always be looking over the participant’s shoulder.
- HDMI output cable running to a large TV in the room next door broadcasting the screen share and audio to observers.
The camera mount - Mr Tappy
The centerpiece of the setup was our camera mount - Mr Tappy. Mr Tappy is a simple mount, which you can attach a mobile device to, with an adjustable arm that extends over the top of the device to attached a camera to.
Meet Mr Tappy:
The best part about Mr Tappy is that he can be used for all types of devices; phone, tablet, iOS, Android, Windows. The mount is flexible enough to accommodate any sized device. The only restriction is needing to attach some velcro to the back of the device for Mr Tappy to secure to.
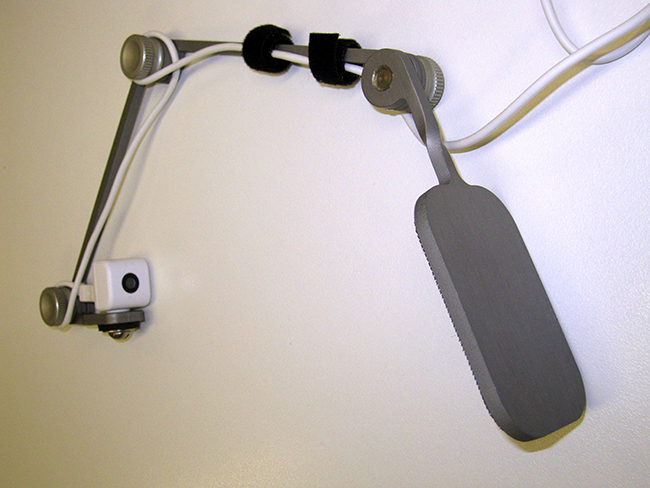
Mr Tappy is the brainchild of Nick Bowmast, who I can happily say I used to work with. He took the idea that came from an old improvised mobile testing sled made out of perspex and turned it in to a high-quality product designed specifically for this purpose. I highly recommend it.
One thing we learned was that it’s important to pick up and hand the device to the participant so that they start with it in their hand. The attached camera mount does make participants reluctant to handle the device. Handing it to them when you first ask them to start doing something on it helps get it in their hand and using it.
Still, a few participants just put it back down on the table and used it there. In our context it wasn’t too much of an issue as using a phone whilst it sits on a tabletop is not an uncommon behavior anyway. Otherwise, it’s important to be aware of it that impacts what you are trying to test.
The cameras
For the camera mounted on the device we used the iCubie camera that Mr Tappy recommends. It’s the smallest and lightest camera that could be found at the time.
It’s downside is that it’s not super high-resolution. Therein lies the trade-off. We considered using a higher quality camera but they all just became too big and bulky to use on the mount. Instead we decided to concede the quality for being less obtrusive.
For the other camera we had on the table camera focused on the participant we used a Logitech HD Pro Webcam C910. It was less important which specific camera we used for this. We used the Logitech as we had one on hand and knew it did good quality HD video and audio.
Recording software
The recording software was where we had to improvise the most. All the applications out there at the moment were either too expensive to bother with, didn’t allow us to capture the output from two different webcams at one time, or required too much post-production work to sync video feeds.
In the end we took an ad-hoc approach of simply having the two camera feeds open on the desktop using separate applications, then using a third application to do a screen capture of the whole desktop. Whilst not the prettiest video outputs you’ll ever see, it captured everything we needed it to.
Where it got tricky was finding the right combination of apps that didn’t have conflicts and worked with the various cameras. We had to do a bit of trial and error with different media players, plus trouble-shooting to make it work but we eventually found the right combination that worked. Here’s what we had running:
- Device camera feed - Quicktime 7 Pro
- Participant camera feed - Quicktime 10
- Screen capture - Quicktime 10
- Audio output for HDMI feed to TV - LineIn
We had to ensure we left enough hard drive on the laptop to record 50-100gb of video. Full resolution videos of an hour session typically ended up at 30gb before we optimized them to a lower level. We kept an external hard drive handy to off-load videos.
We also had two laptops that setup so that we could quickly swap them if necessary. Occasionally this was necessary if a video was taking a while to be processed and saved.
Remote broadcasting of the sessions
The setup of the office, with two rooms next to each other and a big TV in one, worked out really nicely for our setup. An alternative option that we were also considering was to broadcast the session to a separate location using Skype (or similar) to screen share the video and audio to another location.
Lighting
Reflection/glare from the ceiling lights can be an issue in seeing the screen of the device. To avoid this we turned off the lights directly above user (we unscrewed the fluorescent lights).
This creates a problem where the camera can’t deal with the contrast between the screen brightness and the dull background. To compensate for the lack of light we setup a lamp to the side of the user, which lit up their hands. We also turned down the device screen brightness to balance out the difference. The balance between all this needs to be tweaked depending on the exact room.
The unintended side effect of all this was to create a somewhat ‘intimate’ setting in the room for participants to walk in to. We made sure we called it out and explained why so that participants weren’t too put off by it.
Controlling the laptop and video feed
Given that the two rooms were directly next-door we connected a Bluetooth keyboard and mouse to laptop, which we put in the observation room. This allowed the observers to run the laptop and control the video (i.e. starting/stopping and trouble shooting), which helped reduce the load on the moderator in the room.
What would we change next time?
Overall we were very happy with the whole setup. I’d happily take the same approach and recommend it to others - hence why I just put this summary together.
Mr Tappy worked well as the camera mount and solved the problem of a camera mount. I’d still keep looking for a higher resolution camera than the iCubie though.
I’d also keep my eye out for a better media player solution. In fact, as I was putting this post together someone recommended SecuritySpy to me. Despite being made for a different purpose, looks like it would do the trick for a small license fee.
Otherwise, here are some of the approaches I’ve found that other people have used.
Disclaimer: The statements and opinions expressed in this article are those of the author(s) and do not necessarily reflect the positions of Thoughtworks.


